Difference between revisions of "Contrib:BondMatt/Tracker"
| Line 44: | Line 44: | ||
[[Image:Tracker_autotracker2.jpg|800x500px]] | [[Image:Tracker_autotracker2.jpg|800x500px]] | ||
| + | |||
| + | |||
| + | ='''Results'''= | ||
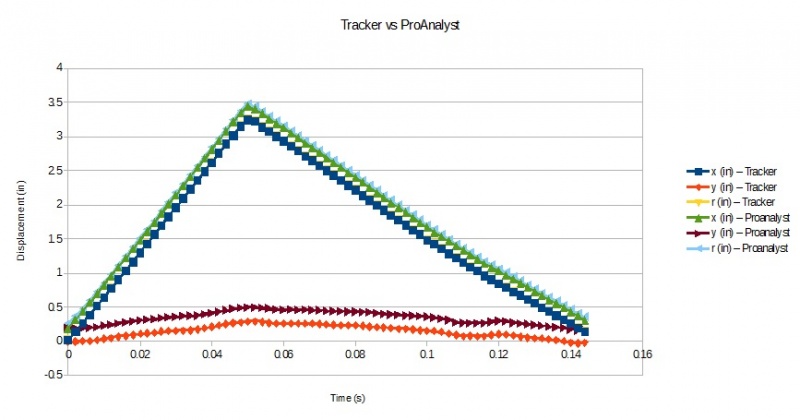
| + | The displacements from Tracker and Proanalyst are similar as shown in the figure below. A modification to the dataset from Tracker was necessary to have the same time scale (this will be investigated and noted in the section above). Additionally, the position of the coordinate system and the tracked feature center seem to be different. This will also be investigated further. | ||
| + | |||
| + | [[Image:Result.jpg|800x500px]] | ||
Latest revision as of 07:28, 15 February 2014
Introduction
A number of open source efforts exist for tracking and analyzing motion with video. Tracker (https://www.cabrillo.edu/~dbrown/tracker/) is an outstanding piece of software. It is easy to use and full featured. Kinovea is an excellent alternative (http://www.kinovea.org/).
This page documents comparisons between Tracker and a commercial software package (ProAnalyst: http://www.xcitex.com/proanalyst-motion-analysis-software.php) to which I have legitimate access through a university.
Theory
A basic introduction to the algorithms employed in this type of software can be found here: http://correlatedsolutions.com/support/index.php?_m=downloads&_a=viewdownload&downloaditemid=9&nav=0,2
ProAnalyst Tutorial
A PDF can be found here: http://www.xcitex.com/Resource%20Center/ProAnalyst/Tutorials/Tutorial%20100%20-%20Learning%20to%20use%20ProAnalyst.pdf
The videos are here: http://www.xcitex.com/Resource%20Center/ProAnalyst/Tutorials/T100%20-%20Video%20files.zip
Analysis with Tracker
1) Import a video:
2) Identify origin and specify orientation of coordinate system:
3) Calibration: Advance to frame 21 and insert a calibration stick along the 'rocker panel' (along the bottom of the body between the wheel wells) and specify the length to be 2.25 (inches). The ProAnalyst tutorial from which this video was obtained calibrates at frame 21 hence this frame selection for this tutorial.
4) Return to frame 1 and add a feature to track (a 'Point Mass' in this case):
5) Hold shift to place the point mass:
6) By default Tracker seems to assume the user will manually specify the location of the feature and advances by one frame (or perhaps more with the right setting). As with other steps there may be alternative methodologies but mine was to return to the first frame as I set up the automated tracking tool. Hit 'Ctrl' and 'Shift' simultaneously and click at the location of point mass A. A small circle and a box with a dashed border will appear. Tracker will search for the pixel arrangement within the small circle in each frame. From one frame to the next it will only look within the search region specified by the box with the dashed outline. This search region will maintain its relative position to the tracked feature.
Results
The displacements from Tracker and Proanalyst are similar as shown in the figure below. A modification to the dataset from Tracker was necessary to have the same time scale (this will be investigated and noted in the section above). Additionally, the position of the coordinate system and the tracked feature center seem to be different. This will also be investigated further.
