Difference between revisions of "Contrib:KeesWouters/partition"
Atywehacyg (Talk | contribs) |
m (Reverted edit of Atywehacyg, changed back to last version by Keeswouters) |
||
| Line 1: | Line 1: | ||
| − | + | =='''Fuse, partition and compound of a structure'''== | |
When you need to apply different material properties to different parts of a mesh created by Salome, you can make a compound of these parts. This has the feature that every ''compound'' can be meshed independently from others. The disadvantage might be the absence of interaction between the contact areas of each part. In the FE analysis by Code Aster this can be countered in various ways, eg. by applying ''contact'' conditions between the contact planes. | When you need to apply different material properties to different parts of a mesh created by Salome, you can make a compound of these parts. This has the feature that every ''compound'' can be meshed independently from others. The disadvantage might be the absence of interaction between the contact areas of each part. In the FE analysis by Code Aster this can be countered in various ways, eg. by applying ''contact'' conditions between the contact planes. | ||
When all parts need to be ''glued'' together at the contact areas, you can use a different approach: first ''fuse'' the parts and later on divide or ''partition'' the parts. Then in the resulting mesh the contact areas between adjacent parts have the same nodes. All the parts are connected together in this way. | When all parts need to be ''glued'' together at the contact areas, you can use a different approach: first ''fuse'' the parts and later on divide or ''partition'' the parts. Then in the resulting mesh the contact areas between adjacent parts have the same nodes. All the parts are connected together in this way. | ||
| − | Creating a ''compound'' in Salome is straight forward, just hit the ''compound'' button, enter a name for the compound and select the various parts you like to add in the compound. | + | Creating a ''compound'' in Salome is straight forward, just hit the ''compound'' button, enter a name for the compound and select the various parts you like to add in the compound.<br/>Creating a ''fuse'' and a ''partition'' is given in more detail below. |
| − | + | ||
| − | + | ||
| − | + | ||
| − | + | ||
| − | + | ||
| − | + | ||
| − | + | ||
| − | + | ||
| − | + | ||
=='''Defining a construction with four bodies in Salome'''== | =='''Defining a construction with four bodies in Salome'''== | ||
Revision as of 12:52, 18 November 2010
Contents
Fuse, partition and compound of a structure
When you need to apply different material properties to different parts of a mesh created by Salome, you can make a compound of these parts. This has the feature that every compound can be meshed independently from others. The disadvantage might be the absence of interaction between the contact areas of each part. In the FE analysis by Code Aster this can be countered in various ways, eg. by applying contact conditions between the contact planes.
When all parts need to be glued together at the contact areas, you can use a different approach: first fuse the parts and later on divide or partition the parts. Then in the resulting mesh the contact areas between adjacent parts have the same nodes. All the parts are connected together in this way.
Creating a compound in Salome is straight forward, just hit the compound button, enter a name for the compound and select the various parts you like to add in the compound.
Creating a fuse and a partition is given in more detail below.
Defining a construction with four bodies in Salome
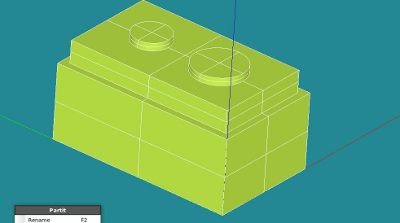
The construction consists of a shoe box, a plate on top of it and two cylinders inside the top plate. In total four different bodies are created by partitioning the main body. For each body it is possible to set different material properties in the C-Aster command file.
General definition of the construction with Salome
First a solid block is defined by the geompy.MakeBoxDXDYDZ(3,5,2). The internal block to cut away a apart of this block is defined by the four outside nodes. Four lines are linked between these nodes and a face is defined by the four lines. Extruding the face up to 1.8 mm high then defines a solid block. After the extrusion a shoe box remains with wall thickness of 0.2 mm.
On top of this shoe box a top plate is defined. It outer dimensions are 0.2 mm less than the shoe box and height is 0.8 mm.
Inside the top plate two cylinders are defined, radii 0.7 and 0.5 and height 1.0 mm. These two cylinders consist of one solid only within Salome because they are defined at once using the two axial areas of the cylinders.
Fusing the parts
Now all parts are defined and we can fuse the three parts together. This is necessary if we want a mesh that is 'glued' together between the various parts. So we fuse:
- Fshoecyl <-- shoebox and cylinders and use the result together with top plate
- Fassembl <-- Fshoecyl and Btop
Now one solid part exists. To be able to apply different material properties to the various parts, we need to partition them.
Partitioning the parts
In order to partition the parts we need to define the boundaries between the parts. For 3D components these are 2D entities, eg. planes.
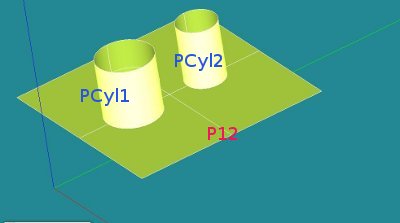
- We define a plane P12 that coincides with the top plane of the shoe box. It divides the shoebox on the one hand and the top plate and cylinders on the other hand. We generate a centre point, a vector in z direction and define a size for this plane: P12 = geompy.MakePlane(centre_point, direction_vector, plane_size). Make sure that the size plane_size is large enough to cover the whole top plane of the shoe box. If this is not the case, Salome does not partition the bottom and top parts. If any part of the two pieces remain in contact, eg. because the dividing plane is too small, partition does not take place.
- Between the cylinders and the top plate the areas of cylinders can be used as a boundary between these parts. Again, make sure that the height of the area is large enough to cover the cylinders, otherwise Salome does not generate the partitions.
The partition can be calculated by MakePartition. The first argument is the fused body (Fassembl), the second argument are the dividing planes determined above. It is possible here to define multiple dividing planes, so the partition can be made in one go:
- Partit=geompy.MakePartition([Fassembl],[P12,PCyl1,PCyl2],[],[],geompy.ShapeType["SOLID"],0,[],0)
Most of the work has been done. We still need to create the groups under the entity Partit by CreateGroup(), UnionIDs() and GetMainShape(). See the attached Python script at the end for more details .
Partitioning within Salome GUI
In Salome GUI, assuming that the fuse and the three dividing planes P12, PCyl1 and PCyl2 are already created, proceed as follows to make the partitioning:
- select Geometry module
- Select Operations --> Partition from the main menu and right click
- tick first partition posibility (thick red line to divide the square in the centre)
- enter valid name for result name of partition ('Partit' in this example)
- in the partition part select:
objects: the part (fuse) you like to partition (Fassemble)
tool object: left click P12, control left click PCyl1 and PCyl2 to get 3_objects
reconstruction limit: keep solid because we need solids (volumes) as results
- apply and close
Now the fuse Fassemble has been divided into its four solids. The four solids, however, are not yet available in the partition Partit. We need to create a group within the partition. So create the partitioned group:
- from the main menu: New Entity --> Group --> Create and select
- shape type: tick block, group name BPshoe by select all, remove and add the appropriate volumes, apply and
- repeat for remaining volumes BPtop, BPcyl1 and BPcyl2
- apply and close
Result of the partitioning - grouping
In the object browser the following tree is now visible:

Under the partition Partit the fuse Fassembl is given, together with the three dividing surfaces: P12, Pcyl1 and Pcyl2. The partitions BPshoe, BPtop, BPcyl1 and BPcyl2 are defined and available to be transfered to the mesh and to Code Aster. Different material properties can be given to them.
Note the now four partions are available, because the two cylinders are now separated by the partition operation.
Of course there are many ways to create the fuses and the partition. This is one way that works for me. Hope that this is useful for you as well. And, pls do not hesitate to add improvements here ;-)
FE Analysis of the construction
In the Python script the geometry described above is given, together with a meshing part. Also adding the previously defined blocks are added as groups in the mesh. A CA command file for calculating the resonance frequencies of the free floating construction is given. All that needs to be done is export the mesh file, update the ASTK file and run C-Aster.
The material properties are not realistic.
The first resonance mode
And a picture of the first resonance frequency at 37 kHz:

- Hope this is useful.


